Hyundai Elantra (CN7): Engine Mechanical System / Drive Belt System
Drive Belt
Repair procedures
* There are two methods to when removing the drive belt.
[When removing the drive belt from the top of the vehicle]
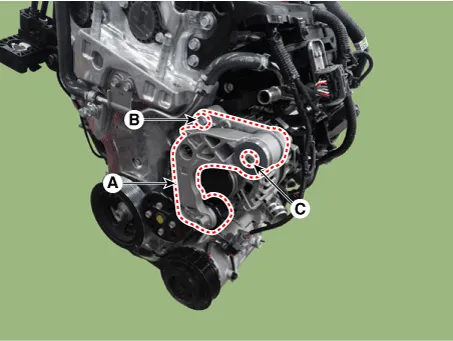
| 1. | Install the wrench to the drive belt tensioner repair hole (A) and turn it clockwise. 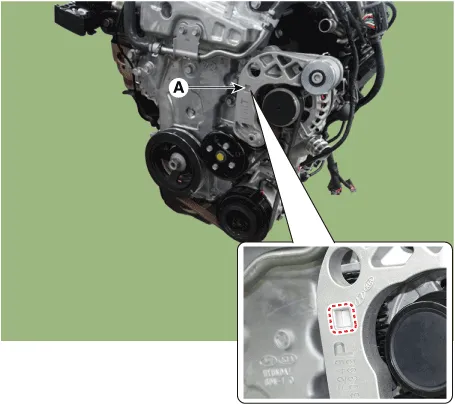
| •
| Fix the drive belt tensioner by installing fixing pin after turning the drive belt tensioner to clockwise. 
|
| •
| Use fixing pins that have the same outer diameter as a 6mm(0.2362 in.) hex wrench or a 6mm(0.2362 in.) hex wrench. |
|
|
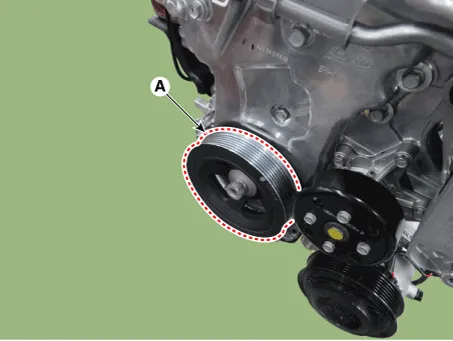
| 2. | Remove the drive belt (A). 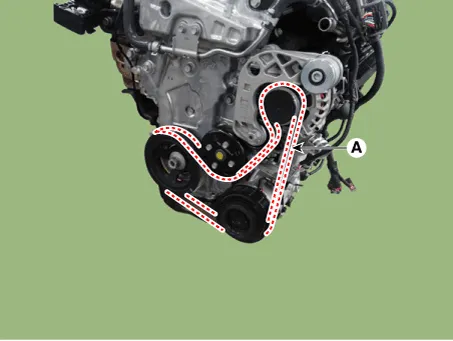
| •
| When removing the drive belt, remove the drive belt from the water pump pulley. |
|
|
| 3. | Install in the reverse order of removal. | •
| When installation of drive belt, make the drive belt as a round hook shape bigger than alternater pulley as a picture down below. Then install it with following order of alternator → airconditioner compressor → crankshaft damper pulley → water pump → drive belt tensioner. 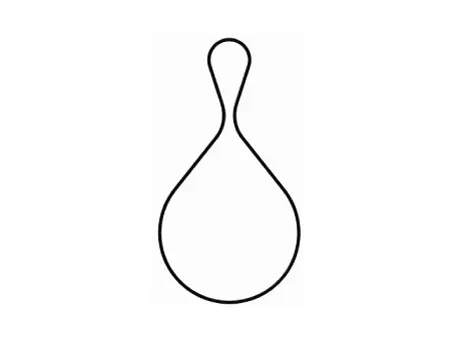
|
|
|
[When removing the drive belt from the bottom of the vehicle]
| 1. | Remove the engine room under cover. (Refer to Engine and Transaxle Assembly - "Engine Room Under Cover") |
| 2. | Turn the spanner to clockwise after installing it to drive belt tensioner arm boss. 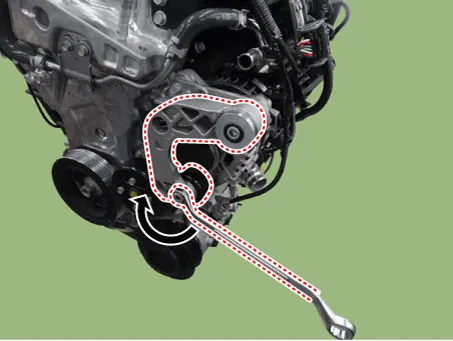
| •
| Fix the drive belt tensioner by installing fixing pin after turning the drive belt tensioner to clockwise.
|
| •
| Use fixing pins that have the same outer diameter as a 6mm(0.2362 in.) hex wrench or a 6mm(0.2362 in.) hex wrench. |
|
|
| 3. | Remove the drive belt (A).
| •
| When removing the drive belt, remove the drive belt from the water pump pulley. |
|
|
| 4. | Install in the reverse order of removal. | •
| When installation of drive belt, make the drive belt as a round hook shape bigger than alternater pulley as a picture down below. Then install it with following order of alternator → airconditioner compressor → crankshaft damper pulley → water pump → drive belt tensioner.
|
|
|
Drive Belt Inspection
| 1. | Visually check the belt for excessive wear, frayed cords etc.If any defect has been found, replace the drive belt. | •
| Cracks on the rib side of a belt are considered acceptable. If the belt has chunks missing from the ribs, it should be replaced. |

|
|
Drive Belt Tensioner
Repair procedures
| 1. | Remove the drive belt. (Refer to Drive Belt System - "Drive Belt") |
| 2. | Remove the drive belt tensioner (A). Tightening torque Bolt (B) : 18.6 - 23.5 N.m (1.9 - 2.4 kgf.m, 13.7 - 17.4 lb-ft) Bolt (C) : 34.3 - 41.2 N.m (3.5 - 4.2 kgf.m, 25.3 - 30.4 lb-ft) |
|
| 3. | Install in the reverse order of removal. | •
| Check the belt tensioner for crack, and damage. Replace if necessary. |
|
|
Check the drive belt tensioner for excessive foreign substances, crack, damage or sticking of pivot shaft. Replace if necessary.
Crankshaft Damper Pulley
Repair procedures
| 1. | Remove the engine room under cover. (Refer to Engine and Transaxle Assembly - "Engine Room Under Cover") |
| 2. | Remove the drive belt. (Refer to Drive Belt System - "Drive Belt") |
| 3. | Remove the crankshaft damper pulley (A). Tightening torque : 66.7 - 70.6 N.m + 98 - 102°[6.8 - 7.2 kgf.m + 98 - 102°, 49.2 - 52.1 lb-ft + 98 - 102°] |
| •
| Fix the ring gears using the SST(09231-2B100,09231-3N100) after removing thestarter. Then remove the crankshaft damperpulley. 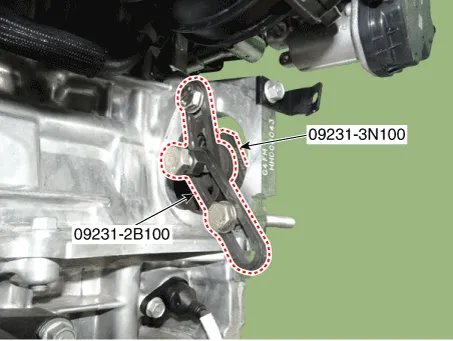
|
|
|
| 4. | Install in the reverse order of removal. |
Check the crankshaft damper pulley for vibration in rotation, oil or dust deposit of V-ribbed part. Replace if necessary.
Repair procedures
Removal
•
Use fender covers to avoid damaging painted surfaces.•
To avoid damage, unplug the wiring connectors carefully while holding the connector portion.
Other information:
Repair procedures
Oil Specification1.The HFC-134a system requires synthetic (PAG) compressor oil whereas the R-12 system requires mineral compressor oil. The two oils must never be mixed.2.Compressor (PAG) oil varies according to compressor model. Be sure to use oil specified for the model of compressor.
Repair procedures
Inspection1.Measure the resistance between the terminals.2.The measured resistance is not within specification, the blower resistor must be replaced. (After removing the resistor)Replacement1.Disconnect the negative (-) battery terminal.


