Hyundai Elantra (CN7): Floor Console / Floor Console Assembly
Components and components location
| Component Location |
| [This illustration shows the LHD type. RHD type is symmetrical.] |

| 1. Floor console assembly |
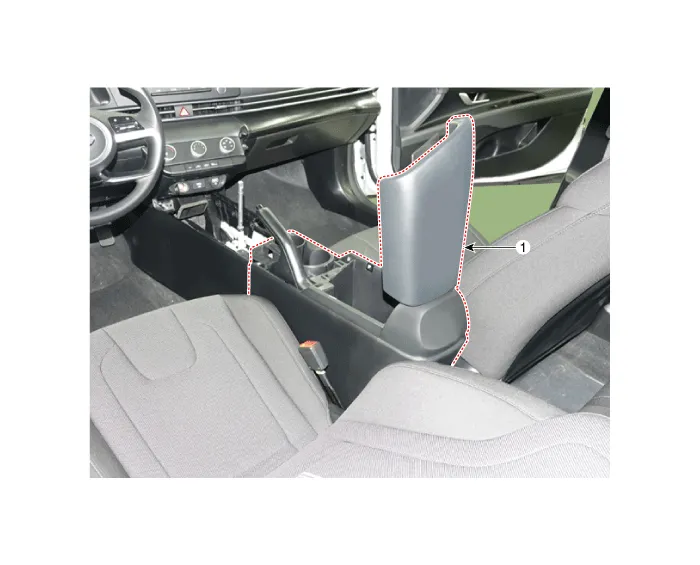
| 1. Floor console assembly |
Repair procedures
| Replacement |
| [Floor console assembly] |
|

|

| 1. | To remove the gear knob & gear boots (A) pull both of it up. [General type]
[N Line]
|


| 2. | Using a screwdriver or remover, remove the floor console side garnish (A).
|

| 3. | After loosening the mounting screw and then using a screwdriver or remover, remove the console upper cover (A).
|

| 4. | Press the lock pin separate the console upper cover connector (A).
|

| 5. | Remove the storage box pad (A).
|

| 6. | After loosening the mounting screws and bolts, remove the floor console assembly (A).
|

| 7. | To install, reverse the removal procedure.
|

| [Floor console side cover] |
|
|
| 1. | Remove the floor console assembly. (Refer to Floor console - "Floor Console Assembly") |
| 2. | After loosening the mounting clip (A) and screw, remove the floor console side cover (B). [LH]
[RH]
|


| 3. | To install, reverse the removal procedure.
|
| [Floor console assembly] |
|
|
| 1. | Remove the gear knob & boots (A) pull both of it up.
|

| 2. | Using a screwdriver or remover, remove the floor console side garnish (A).
|

| 3. | Using a screwdriver or remover, remove the parking brake cover (A).
|

| 4. | After loosening the mounting screw and then using a screwdriver or remover, remove the console upper cover (A).
|

| 5. | Remove the storage box pad (A).
|
| 6. | After loosening the mounting screws and bolts, remove the floor console assembly (A).
|

| 7. | To install, reverse the removal procedure.
|
| [Floor console side cover] |
|
|
| 1. | Remove the floor console assembly. (Refer to Floor console - "Floor Console Assembly") |
| 2. | After loosening the mounting clip and screw, remove the floor console side cover (A). [LH]
[RH]
|


| 3. | To install, reverse the removal procedure.
|
Components[This illustration shows the LHD type. RHD type is symmetrical.]1. Floor console side cover [LH]2. Floor console side cover [RH]3. Floor console upper cover4.
Components and components location Component Location [This illustration shows the LHD type. RHD type is symmetrical.]1. Rear console cover Repair procedures Replacement • When removing with a flat - tip screwdriver or remover, wrap protective tape around the tools to prevent damage to components.
Other information:
Hyundai Elantra (CN7) 2021-2026 Service Manual: Description and operation
DescriptionSystem OverviewThe System offers the following features:– Human / machine interface through a 1-stage button, for terminal switching and engine start.– Control of external relays for ACC / IGN1 / IGN2 terminal switching and STARTER, without use of mechanical ignition switch.
Hyundai Elantra (CN7) 2021-2026 Service Manual: General safety information and caution
Instructions (R-134a)When Handling Refrigerant1.R-134a liquid refrigerant is highly volatile. A drop on the skin of your hand could result in localized frostbite. When handling the refrigerant, be sure to wear gloves. 2.It is standard practice to wear goggles or glasses to protect your eyes, and gloves to protect your hands.
Categories
- Manuals Home
- Hyundai Elantra Owners Manual
- Hyundai Elantra Service Manual
- Integrated Thermal Management Module (ITM)
- Maintenance
- Front Radar Unit
- New on site
- Most important about car
