Hyundai Elantra: Brake System / Brake Line
Components and components location
| Components |

Repair procedures
| Removal |
Brake Tube [Engine Room]
| 1. | Disconnect the brake fiuid level switch connector, and remove the reservoir cap. |
| 2. | Remove the brake fluid from the master cylinder reservior with a syringe.
|
| 3. | Remove the brake tube after loosening the flare nuts from the ESC, master cylinder and brake tube connector.
|
Brake Hose [Front]
| 1. | Disconnect the brake fluid level sensor connector (A).
|
| 2. | Remove the brake fluid from the master cylinder reservior with a syringe.
|
| 3. | Loosen the wheel nuts slightly. Raise the vehicle, and make sure it is securely supported. |
| 4. | Remove the front wheel and tire (A) from the front hub.
|
| 5. | Remove the brake hose clip (A). |
| 6. | Disconnect the tube after loosening the tube flare nut (B).
|
| 7. | Remove the brake hose bracket mounting bolt (A).
|
| 8. | Remove the hose after loosening the brake hose bolt (A) from the caliper.
|
Brake Hose [Rear]
| 1. | Disconnect the brake fluid level sensor connector (A).
|
| 2. | Remove the brake fluid from the master cylinder reservior with a syringe.
|
| 3. | Loosen the wheel nuts slightly. Raise the vehicle, and make sure it is securely supported. |
| 4. | Remove the front wheel and tire (A) from the front hub.
|
| 5. | Remove the brake hose clip (A). |
| 6. | Disconnect the tube after loosening the tube flare nut (B).
|
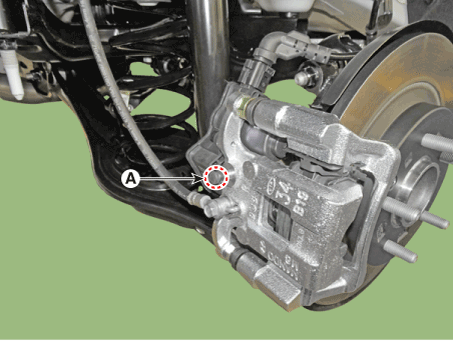
| 7. | Remove the hose after loosening the brake hose bolt (A) from the caliper.
[Rear torsion beam parking cable type]
[Rear torsion beam EPB type]
[Rear multi link parking cable type]
[Rear multi link EPB type]
|
Drum brake hose [Rear]
| 1. | Disconnect the brake fluid level sensor connector (A).
|
| 2. | Remove the brake fluid from the master cylinder reservoir with a syringe.
|
| 3. | Loosen the wheel nuts slightly. Raise the vehicle, and make sure it is securely supported. |
| 4. | Remove the rear wheel and tire (A) from the rear hub.
|
| 5. | Loosen the tube flare nut (A). |
| 6. | Loosen the brake hose bracket bolt (B).
|
| 7. | Loosen the brake hose bracket bolt (A).
|
| 8. | Remove the brake hose after loosening the hose flare nut (A).
|
| Inspection |
| 1. | Check the brake tubes for cracks, crimps and corrosion. |
| 2. | Check the brake tube flare nuts for damage and fluid leakage. |
| Installation |
| 1. | To install, reverse the removal procedures.
|
| 2. | After installation, bleed the brake system. (Refer to Brake System - "Brake Bleeding Prcoedures") |
 Master Cylinder
Components and components location
Components1. Reservoir cap2. Reservoir3. Brake fluid lever sensor4. Master cylinder5. Brake booster6. Push road
Repair procedures
Removal[LHD]1...
 Brake oil
Specifications
Specification
Fluid Type
DOT 4
Reservoir Quantity (cc)
Total VolumeA + B + C + D + E + F405 ± 20MAX LEVEL A + B + C + D + E 392 ± 20ON LEVELB + C + D + E155 ± 10MIN LEVELC + D + E107 ± 10PART LEVELDPri : 44 ± 5ESec : 37 ± 5CLUTCH LEVEL F 13 ± 5
Repair procedures
Replacement1...
Other information:
Hyundai Elantra (CN7) 2021-2025 Owner's Manual: Vanity mirror lamp
Push the switch to turn the light on or off. • : The lamp will turn on if this button is pressed. • : The lamp will turn off if this button is pressed. NOTICE Always have the switch in the off position when the vanity mirror lamp is not in use...
Hyundai Elantra (CN7) 2021-2025 Owner's Manual: Securing a child restraint seat with “Tether Anchor” system
First secure the child restraint with the LATCH lower anchors or the seat belt. If the child restraint manufacturer recommends that the top tether strap be attached, attach and tighten the top tether strap to the top tether strap anchor. Child restraint hook holders are located on the rear of the seatbacks...
Copyright © 2025 www.helantra7.com


.png)
.png) or
or
.png) position.
position.